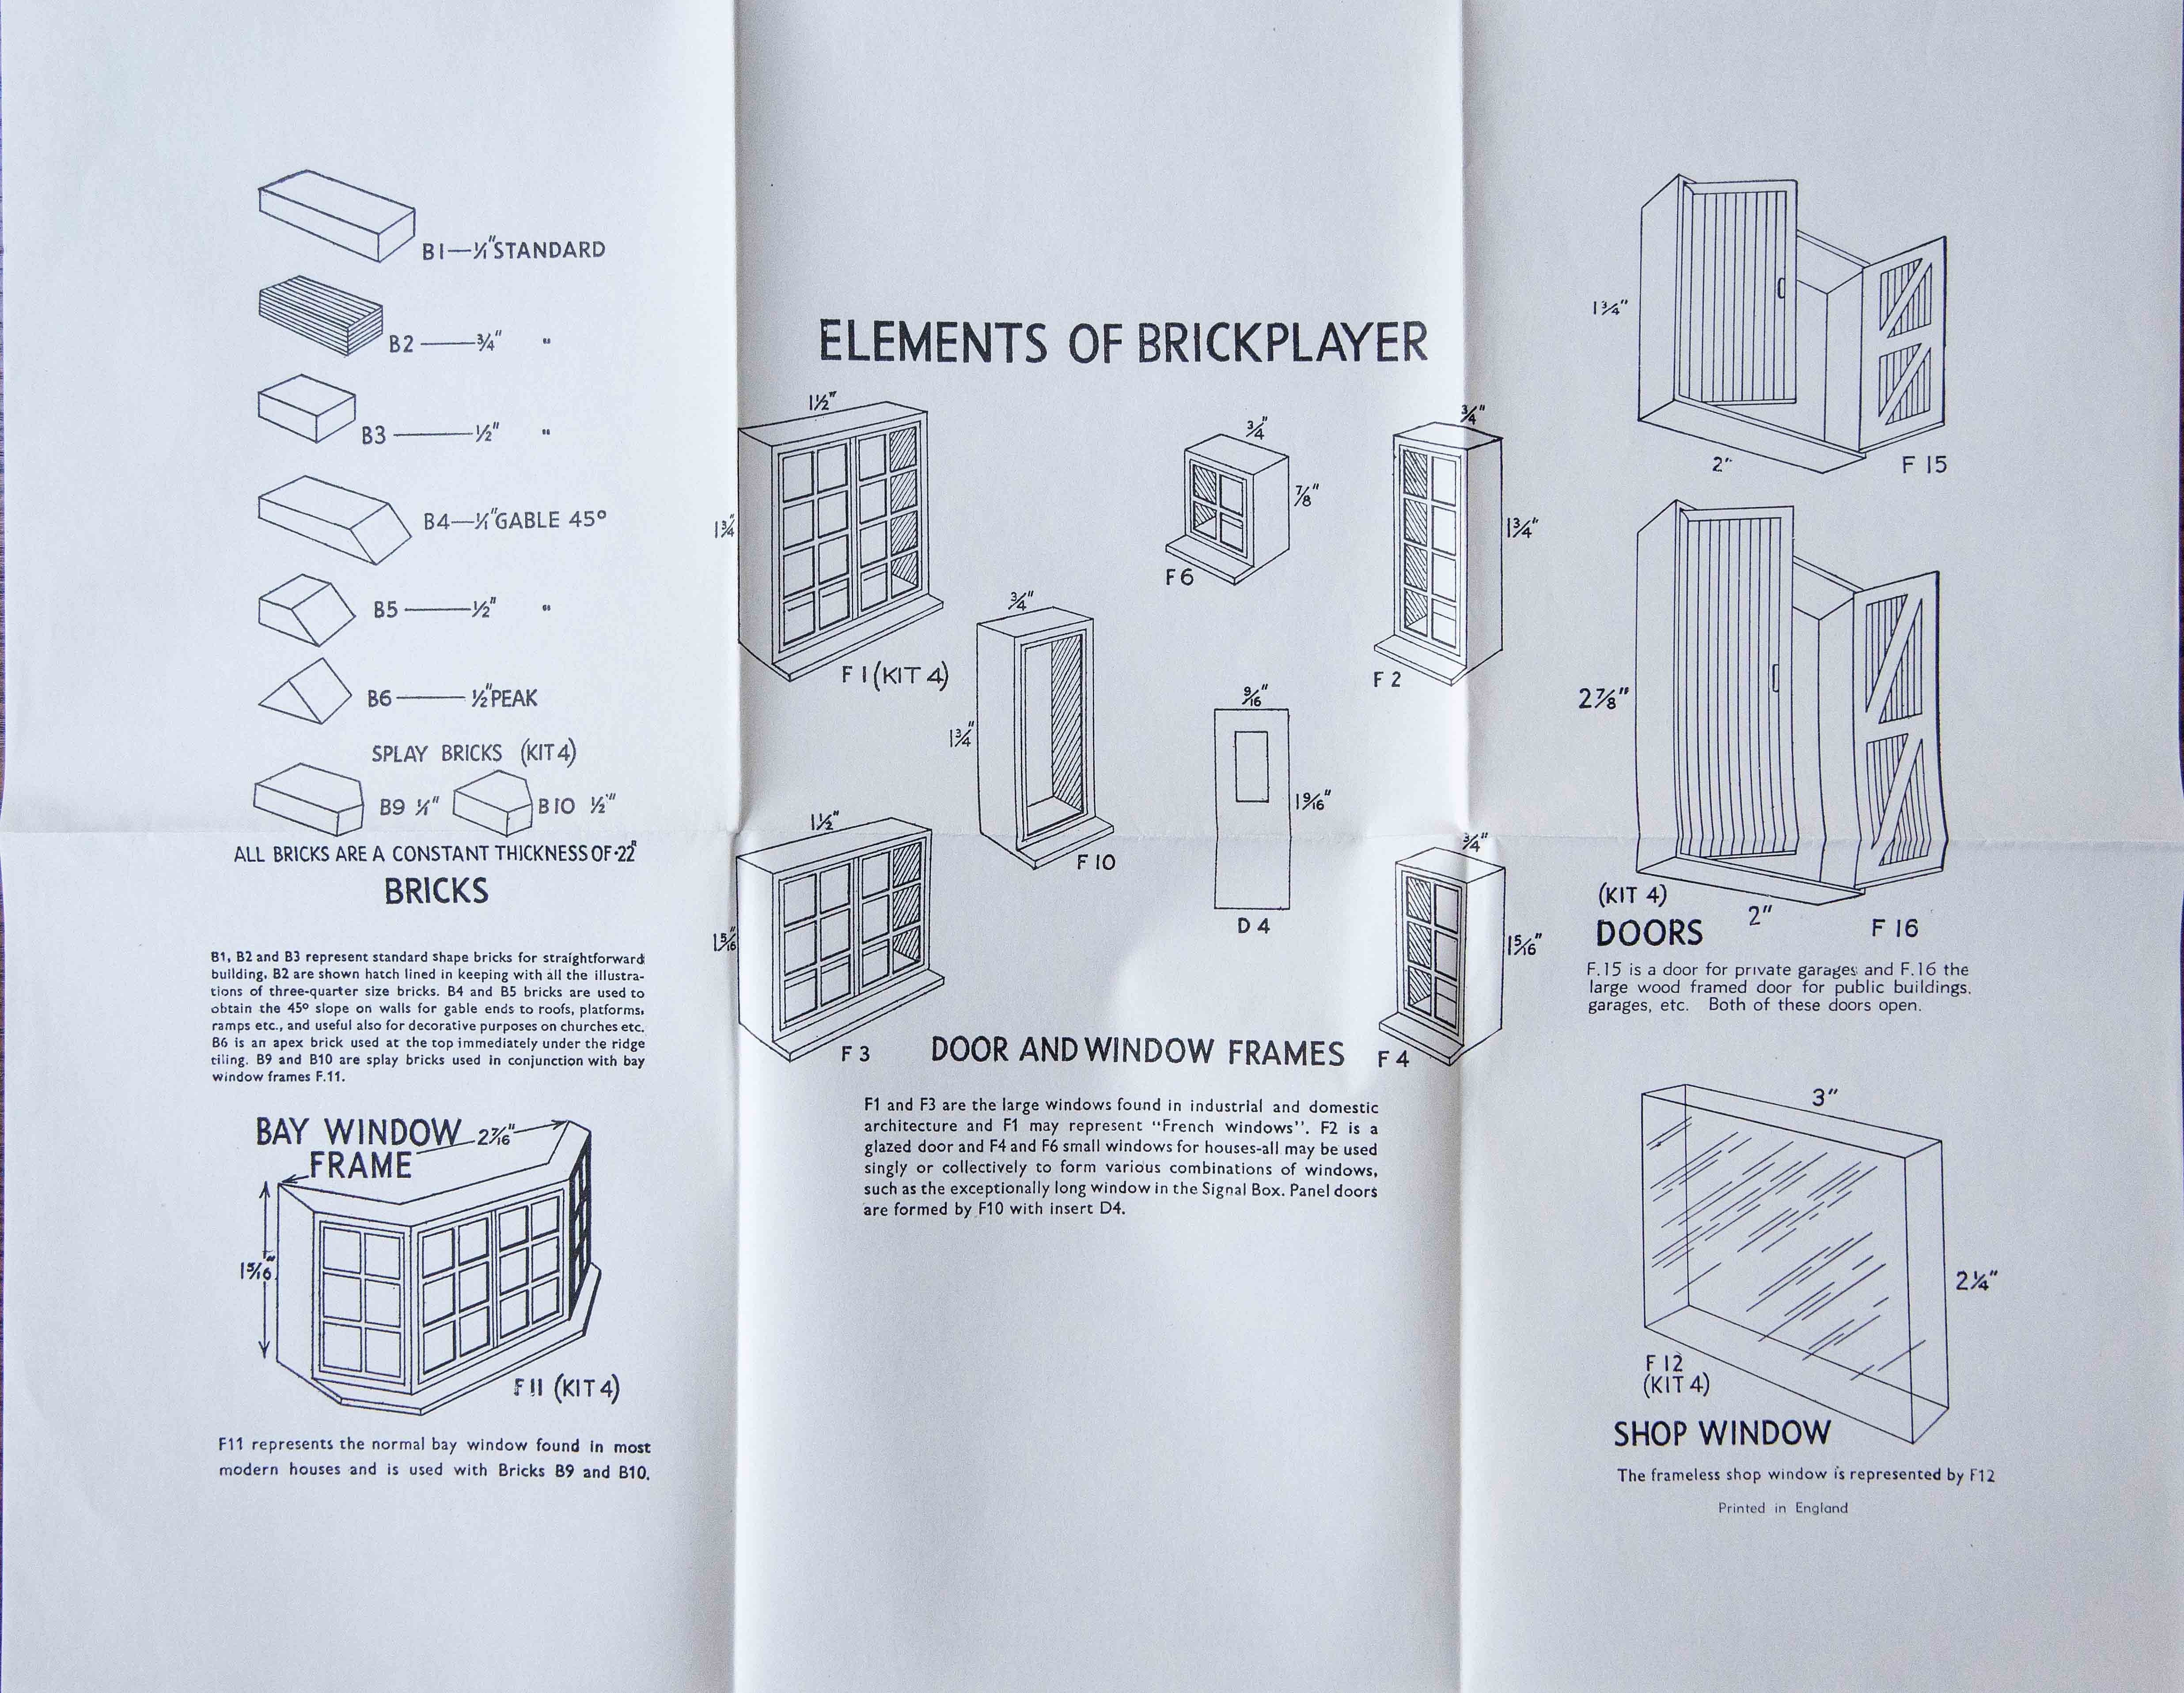
A full brick, which was 1" long, therefore was implicitly 4 feet long in the scaled up building. Of course, real bricks are not this big. In the 1950s and 1960s, a UK standard brick was 9" long, 3½" high and 4½" deep, but scaling this down by 1:48 would mean unfeasibly tiny bricks to work with (and ridiculous amounts of time to build with). The Brickplayer bricks are a compromise, but they retain the feature that the depth is half the length. Thus a full Brickplayer brick is 1" long and ½" deep. However, it is 7⁄32" high, making it look thinner than a real brick but allowing more flexibility in the heights of windows, etc. Thus an individual course of bricks would be 7⁄32" high. The fact that bricks are ½" deep means that walls are implicitly 2 feet thick in the scaled up building. That is unrealistic but reducing that depth to something more realistic would have given models less stable walls. It does mean that buildings cannot have realistic internal walls - Brickplayer was never designed to build dolls houses! The sheet below shows the elements of Standard Brickplayer Kits 3 and 4 and their dimensions. (Clicking on the title underneath the image will show it full screen, making it easier to read the dimensions.)
The image below shows actual components.
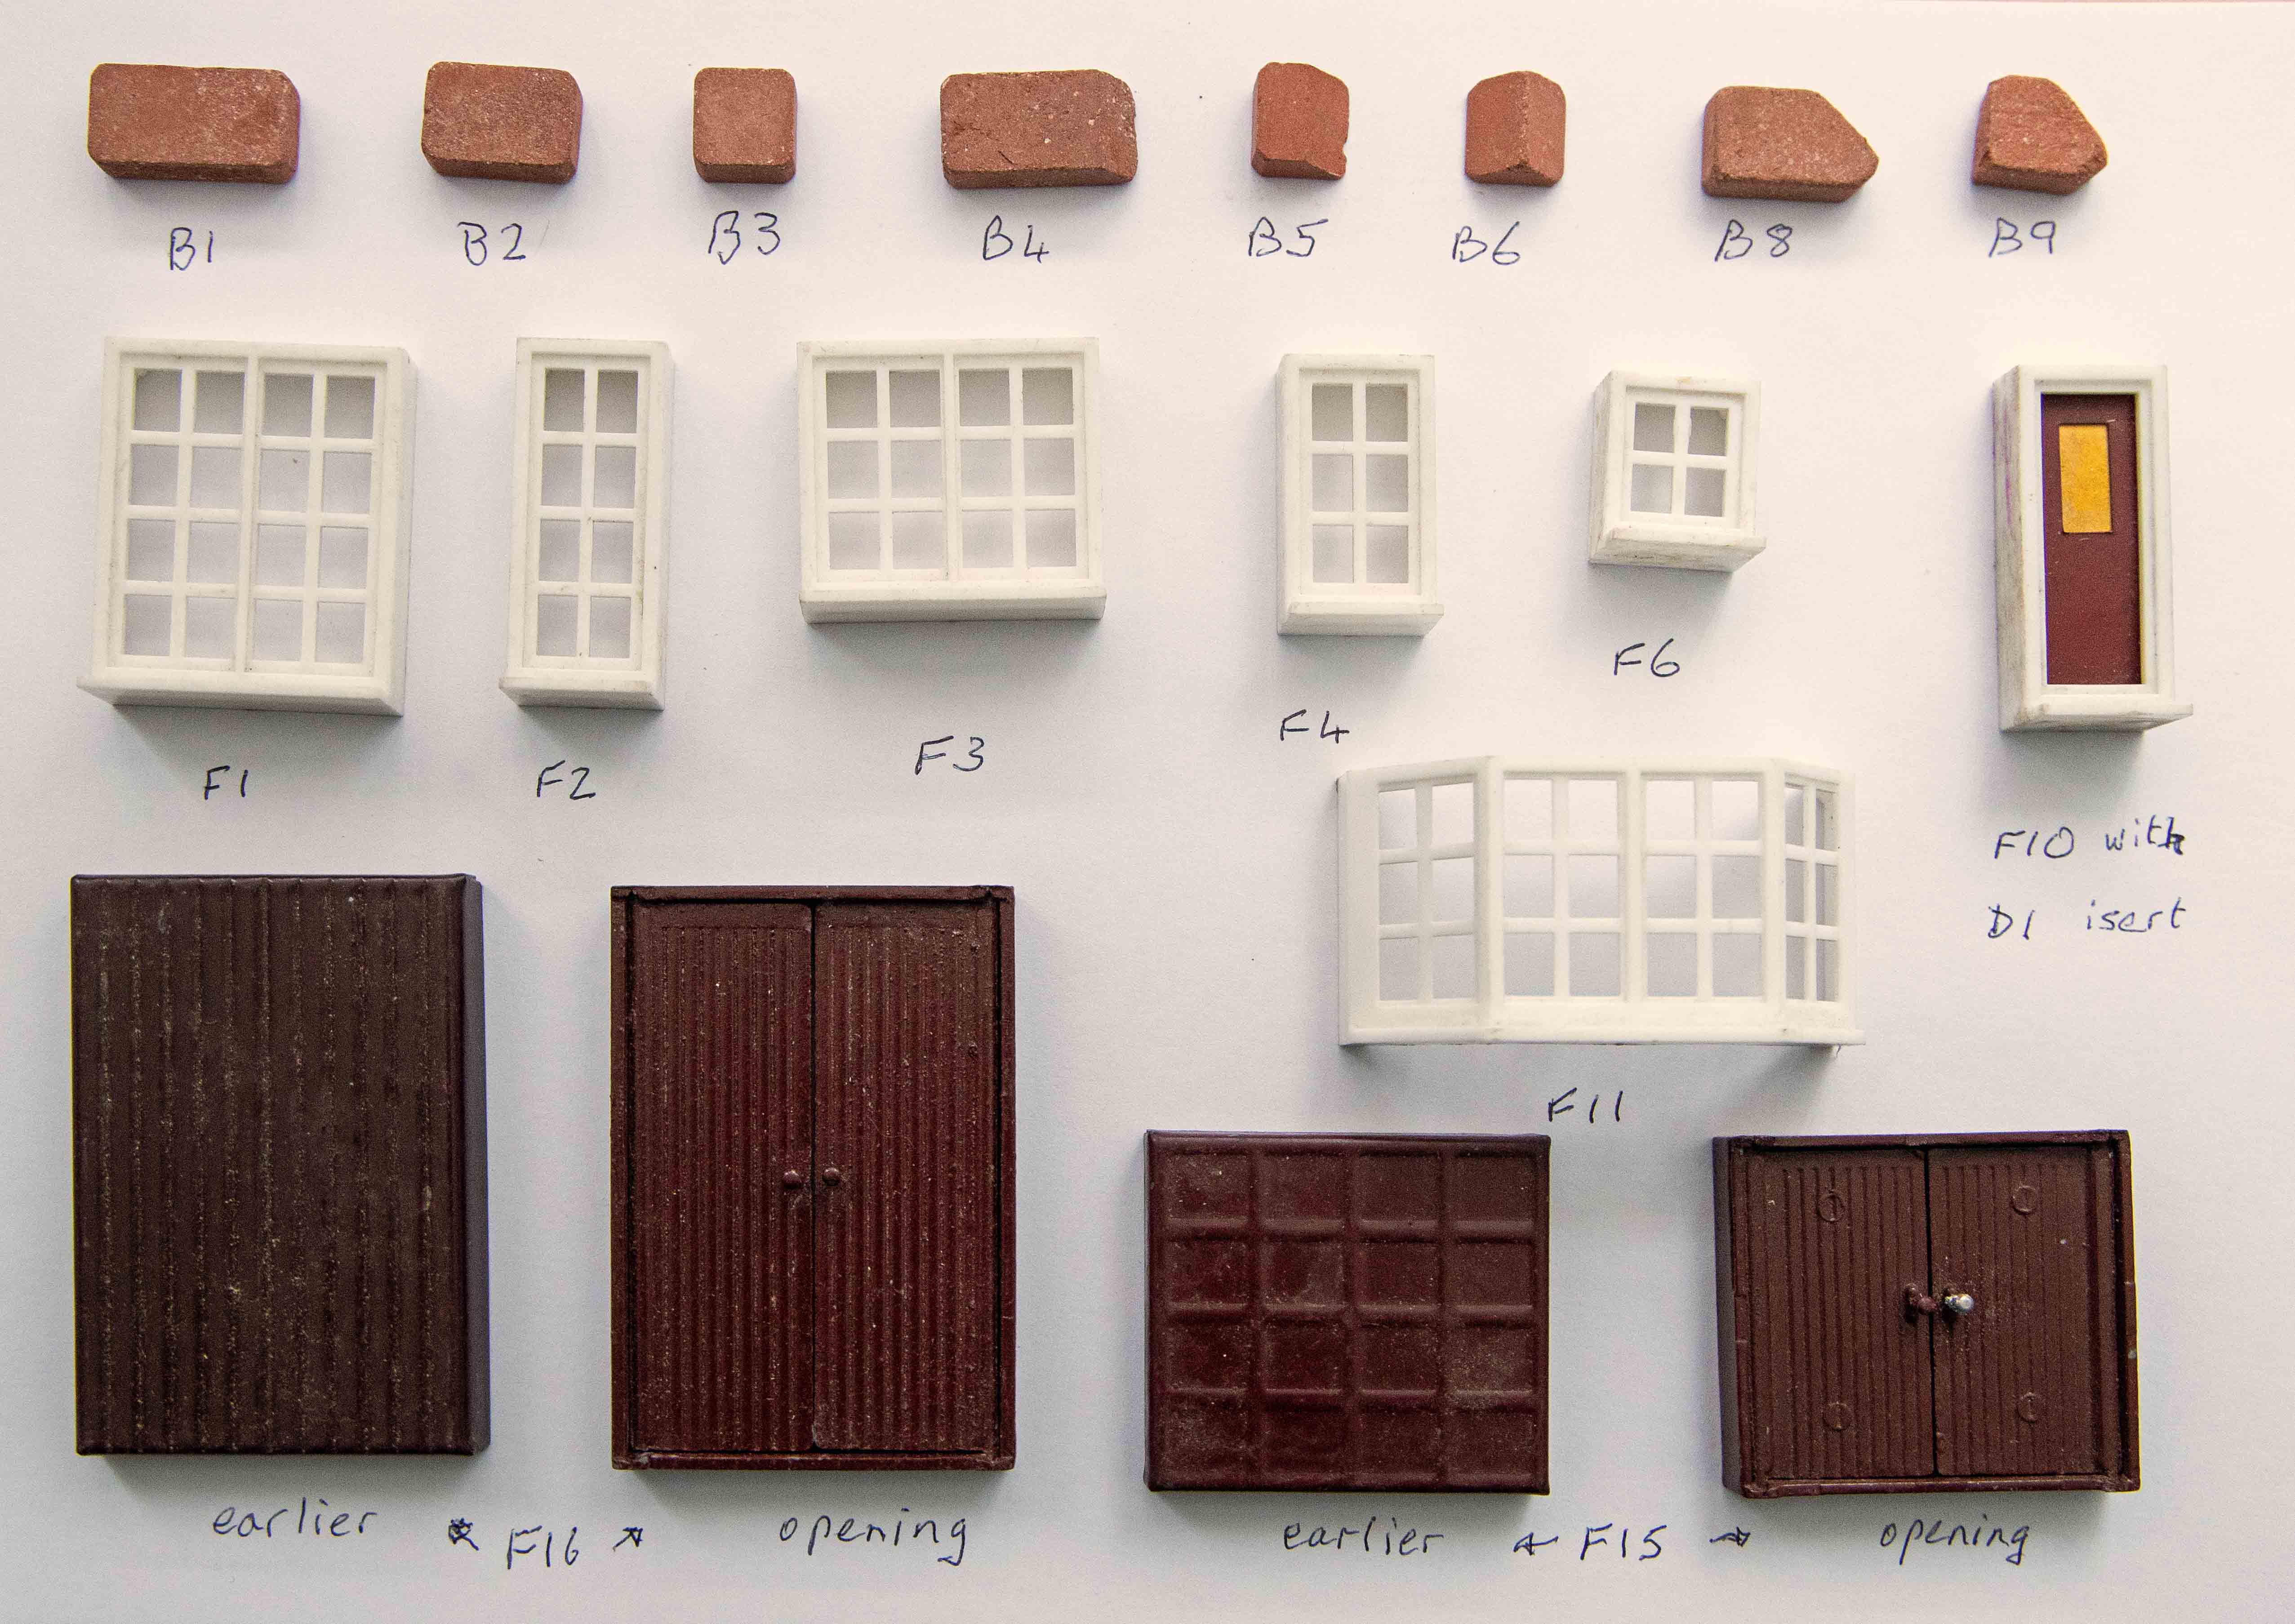
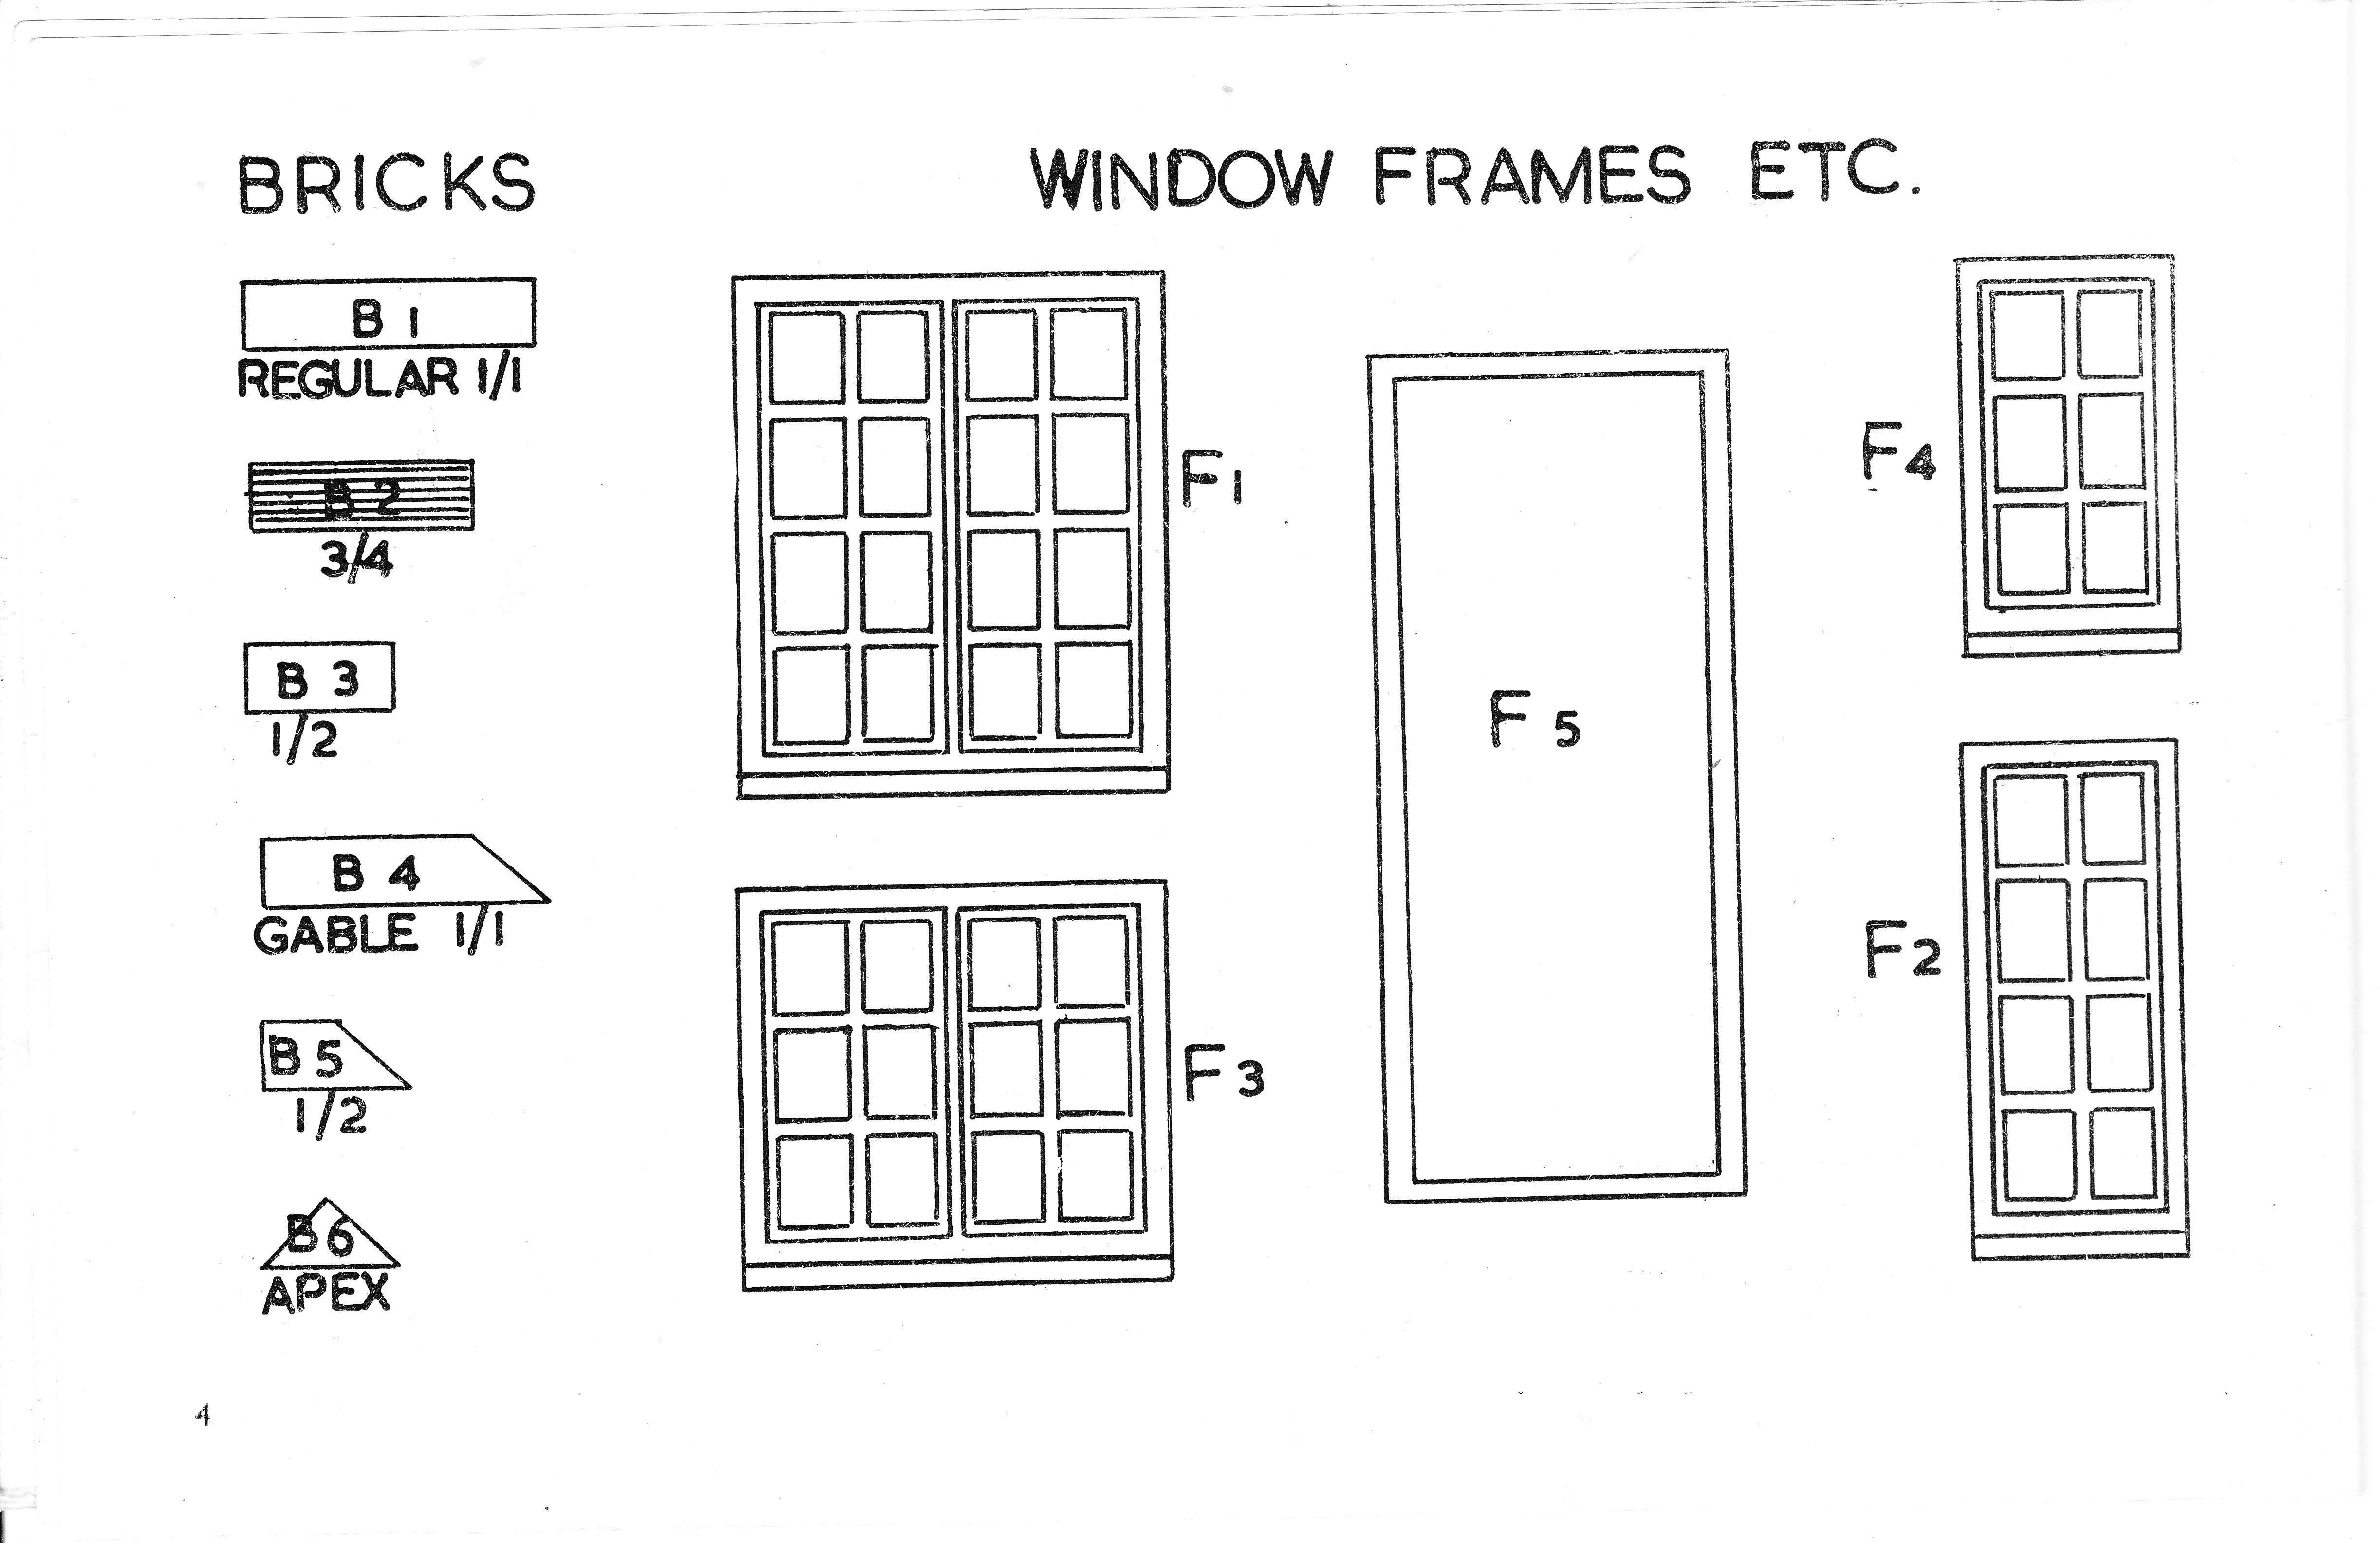
Brick B1 is a full-size brick, B2 is a three-quarters brick (length ¾") and B3 is a half brick (½" long). These were the basic workhorses of Brickplayer construction. Kits contained hundreds of these bricks.
Bricks B4, B5 and B6 were for creating gable ends, with B6 being the apex brick. Bricks B8 and B9 enabled walls to turn a 45° angle, and were used for creating bay windows (only provided in Kit 4). See the instruction booklet for how these more specialised bricks were used in some of the models.
Five different basic window sizes were produced, ranging from the largest, F1 (only in Kit 4), to F6, the smallest. The bay window F11 only came in Kit 4. The shop window F12 (also only in Kit 4) was not very convincing and easily became distorted or bent - I do not have a decent surviving specimen. The widths of these windows match with brick lengths, the smallest ones being ¾" wide. The heights were designed to correspond to an exact number of brick courses. For instance, the tallest ones, at 1¾" high, correspond to 8 courses.
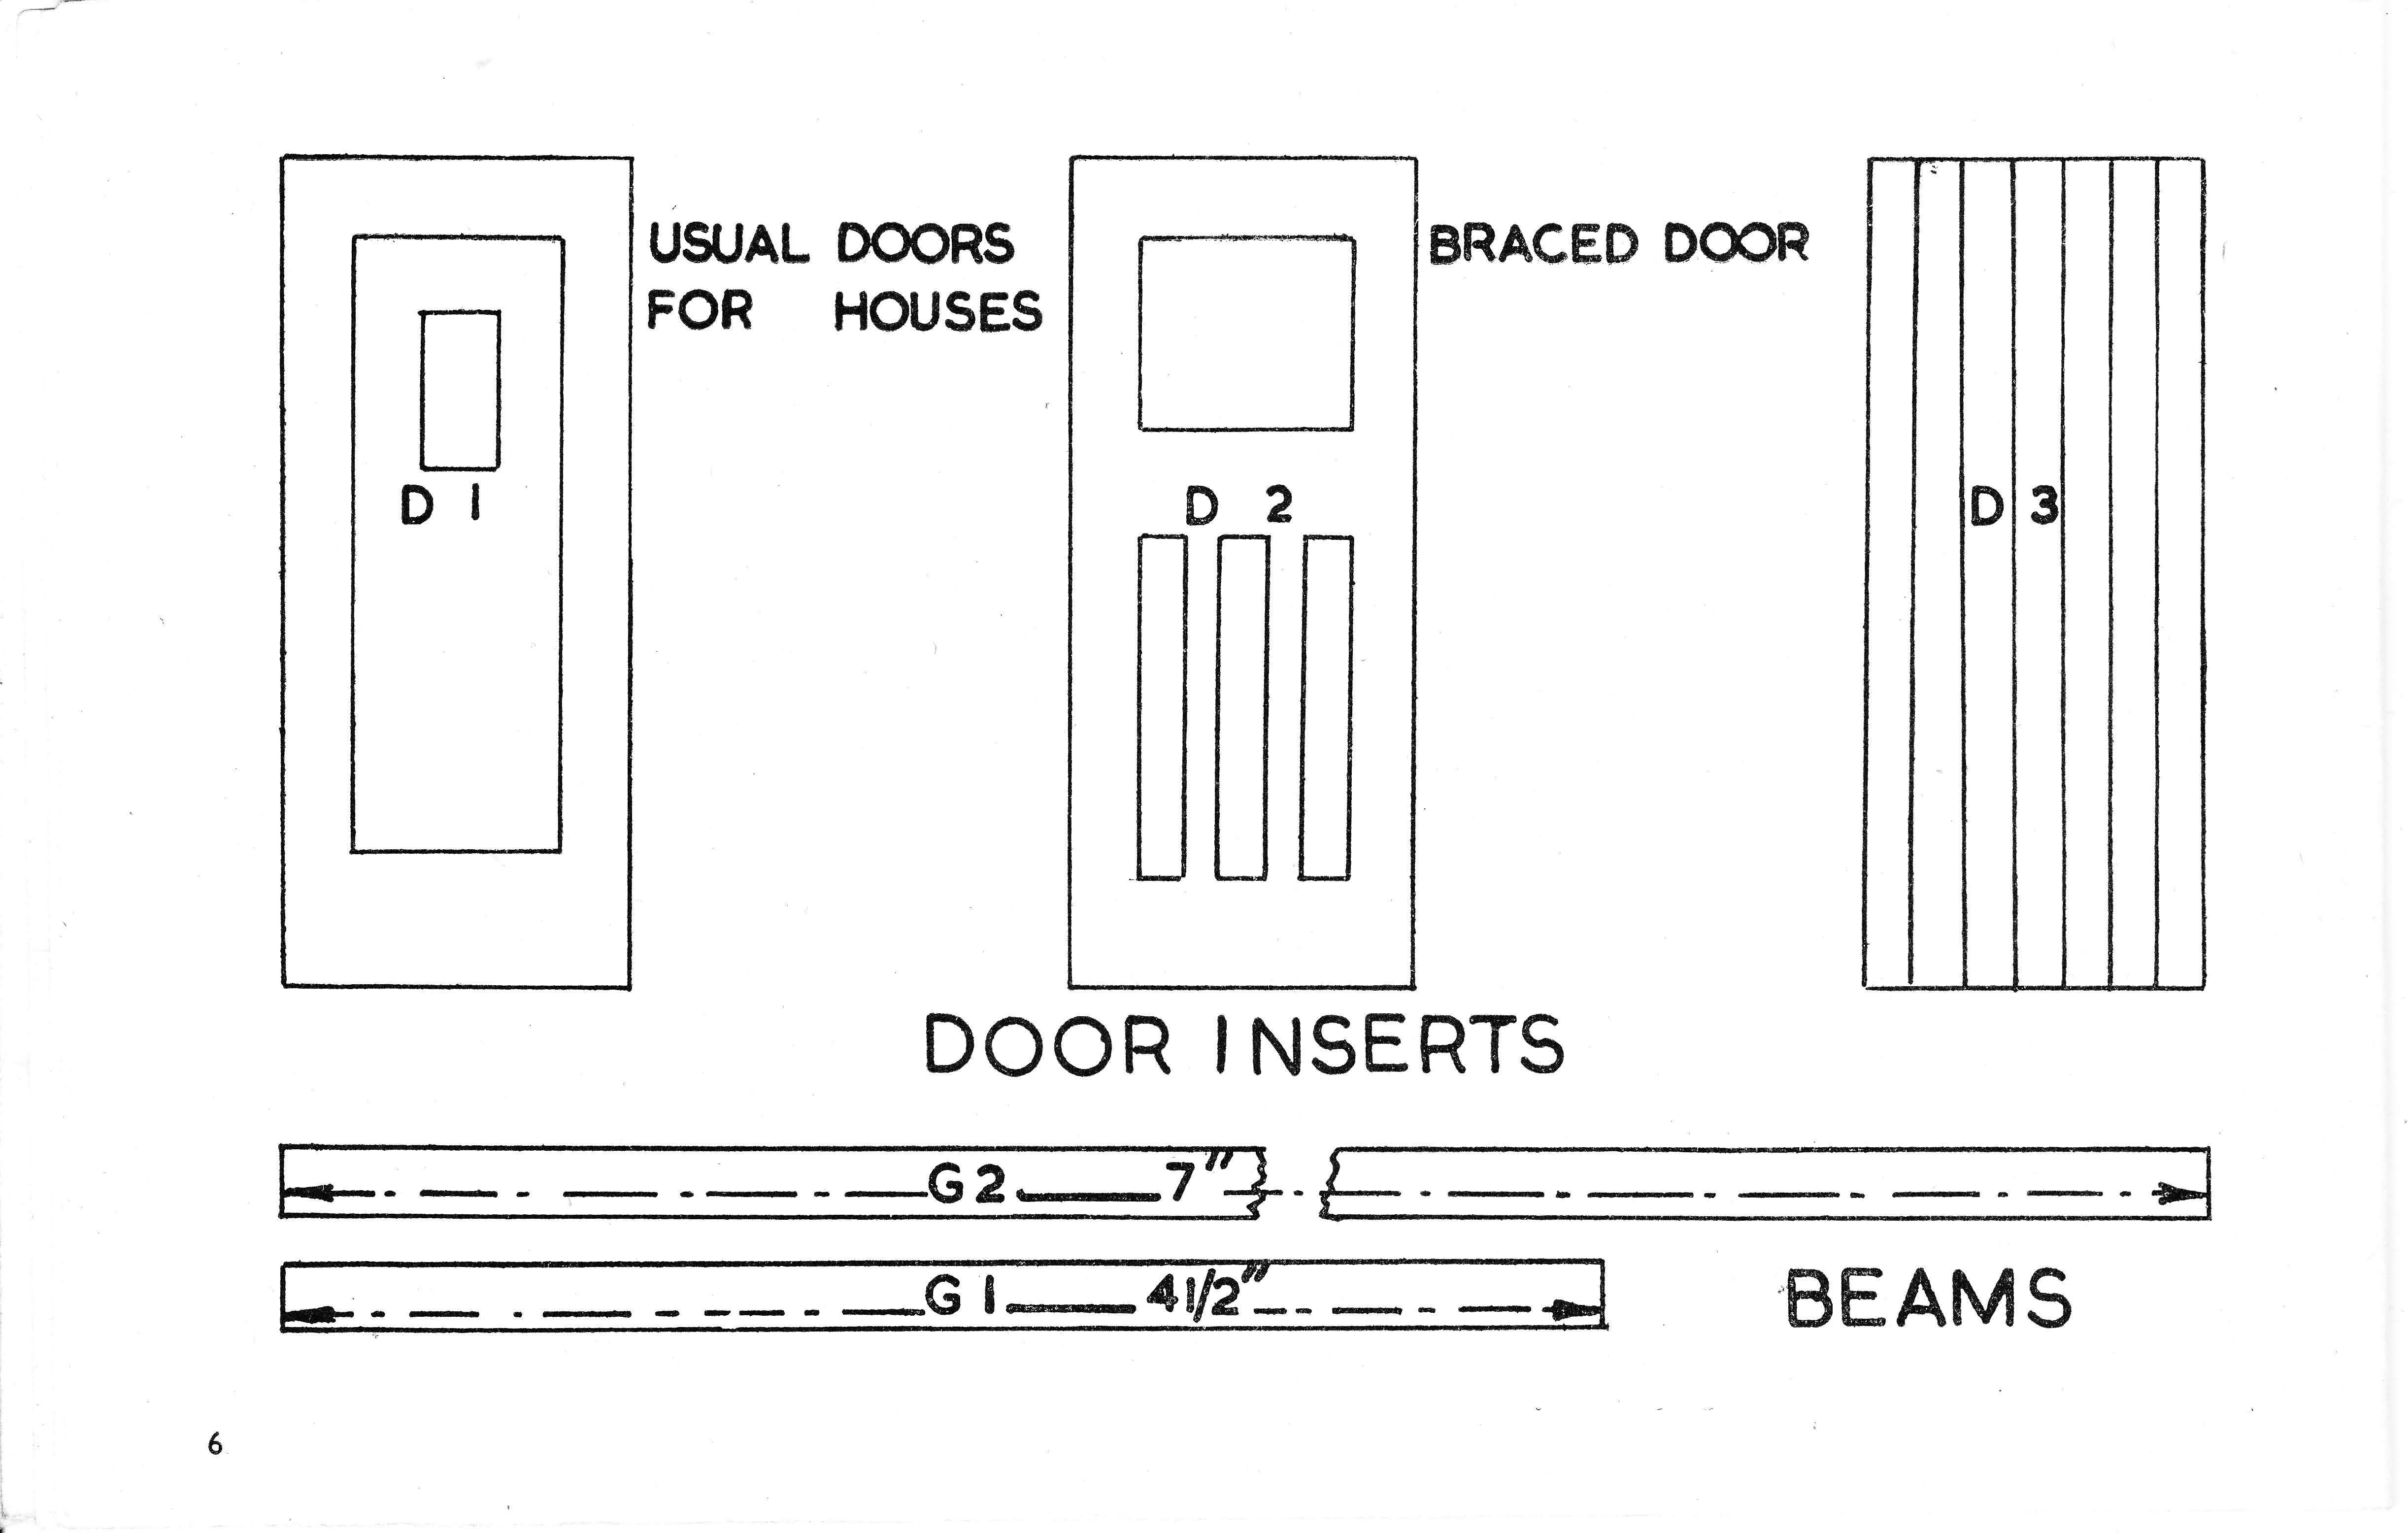
The remaining elements are three doors. The frame F10 could be used with or without the insert D1. Without the insert it can be a window or a simple glazed door. With the insert it is definitely a door. The width of ¾" scales up to 3 feet, the width of a standard door (with frame). The other two doors, F15 and F16, are garage or industrial doors. The first Standard Brickplayer kits had solid doors, but later they were hinged to open. The first kits also had metal window and door frames, but these were later replaced by plastic.
Finally, the Farm Kit introduced two new elements, a stable door and a wicket gate, shown in the image below.
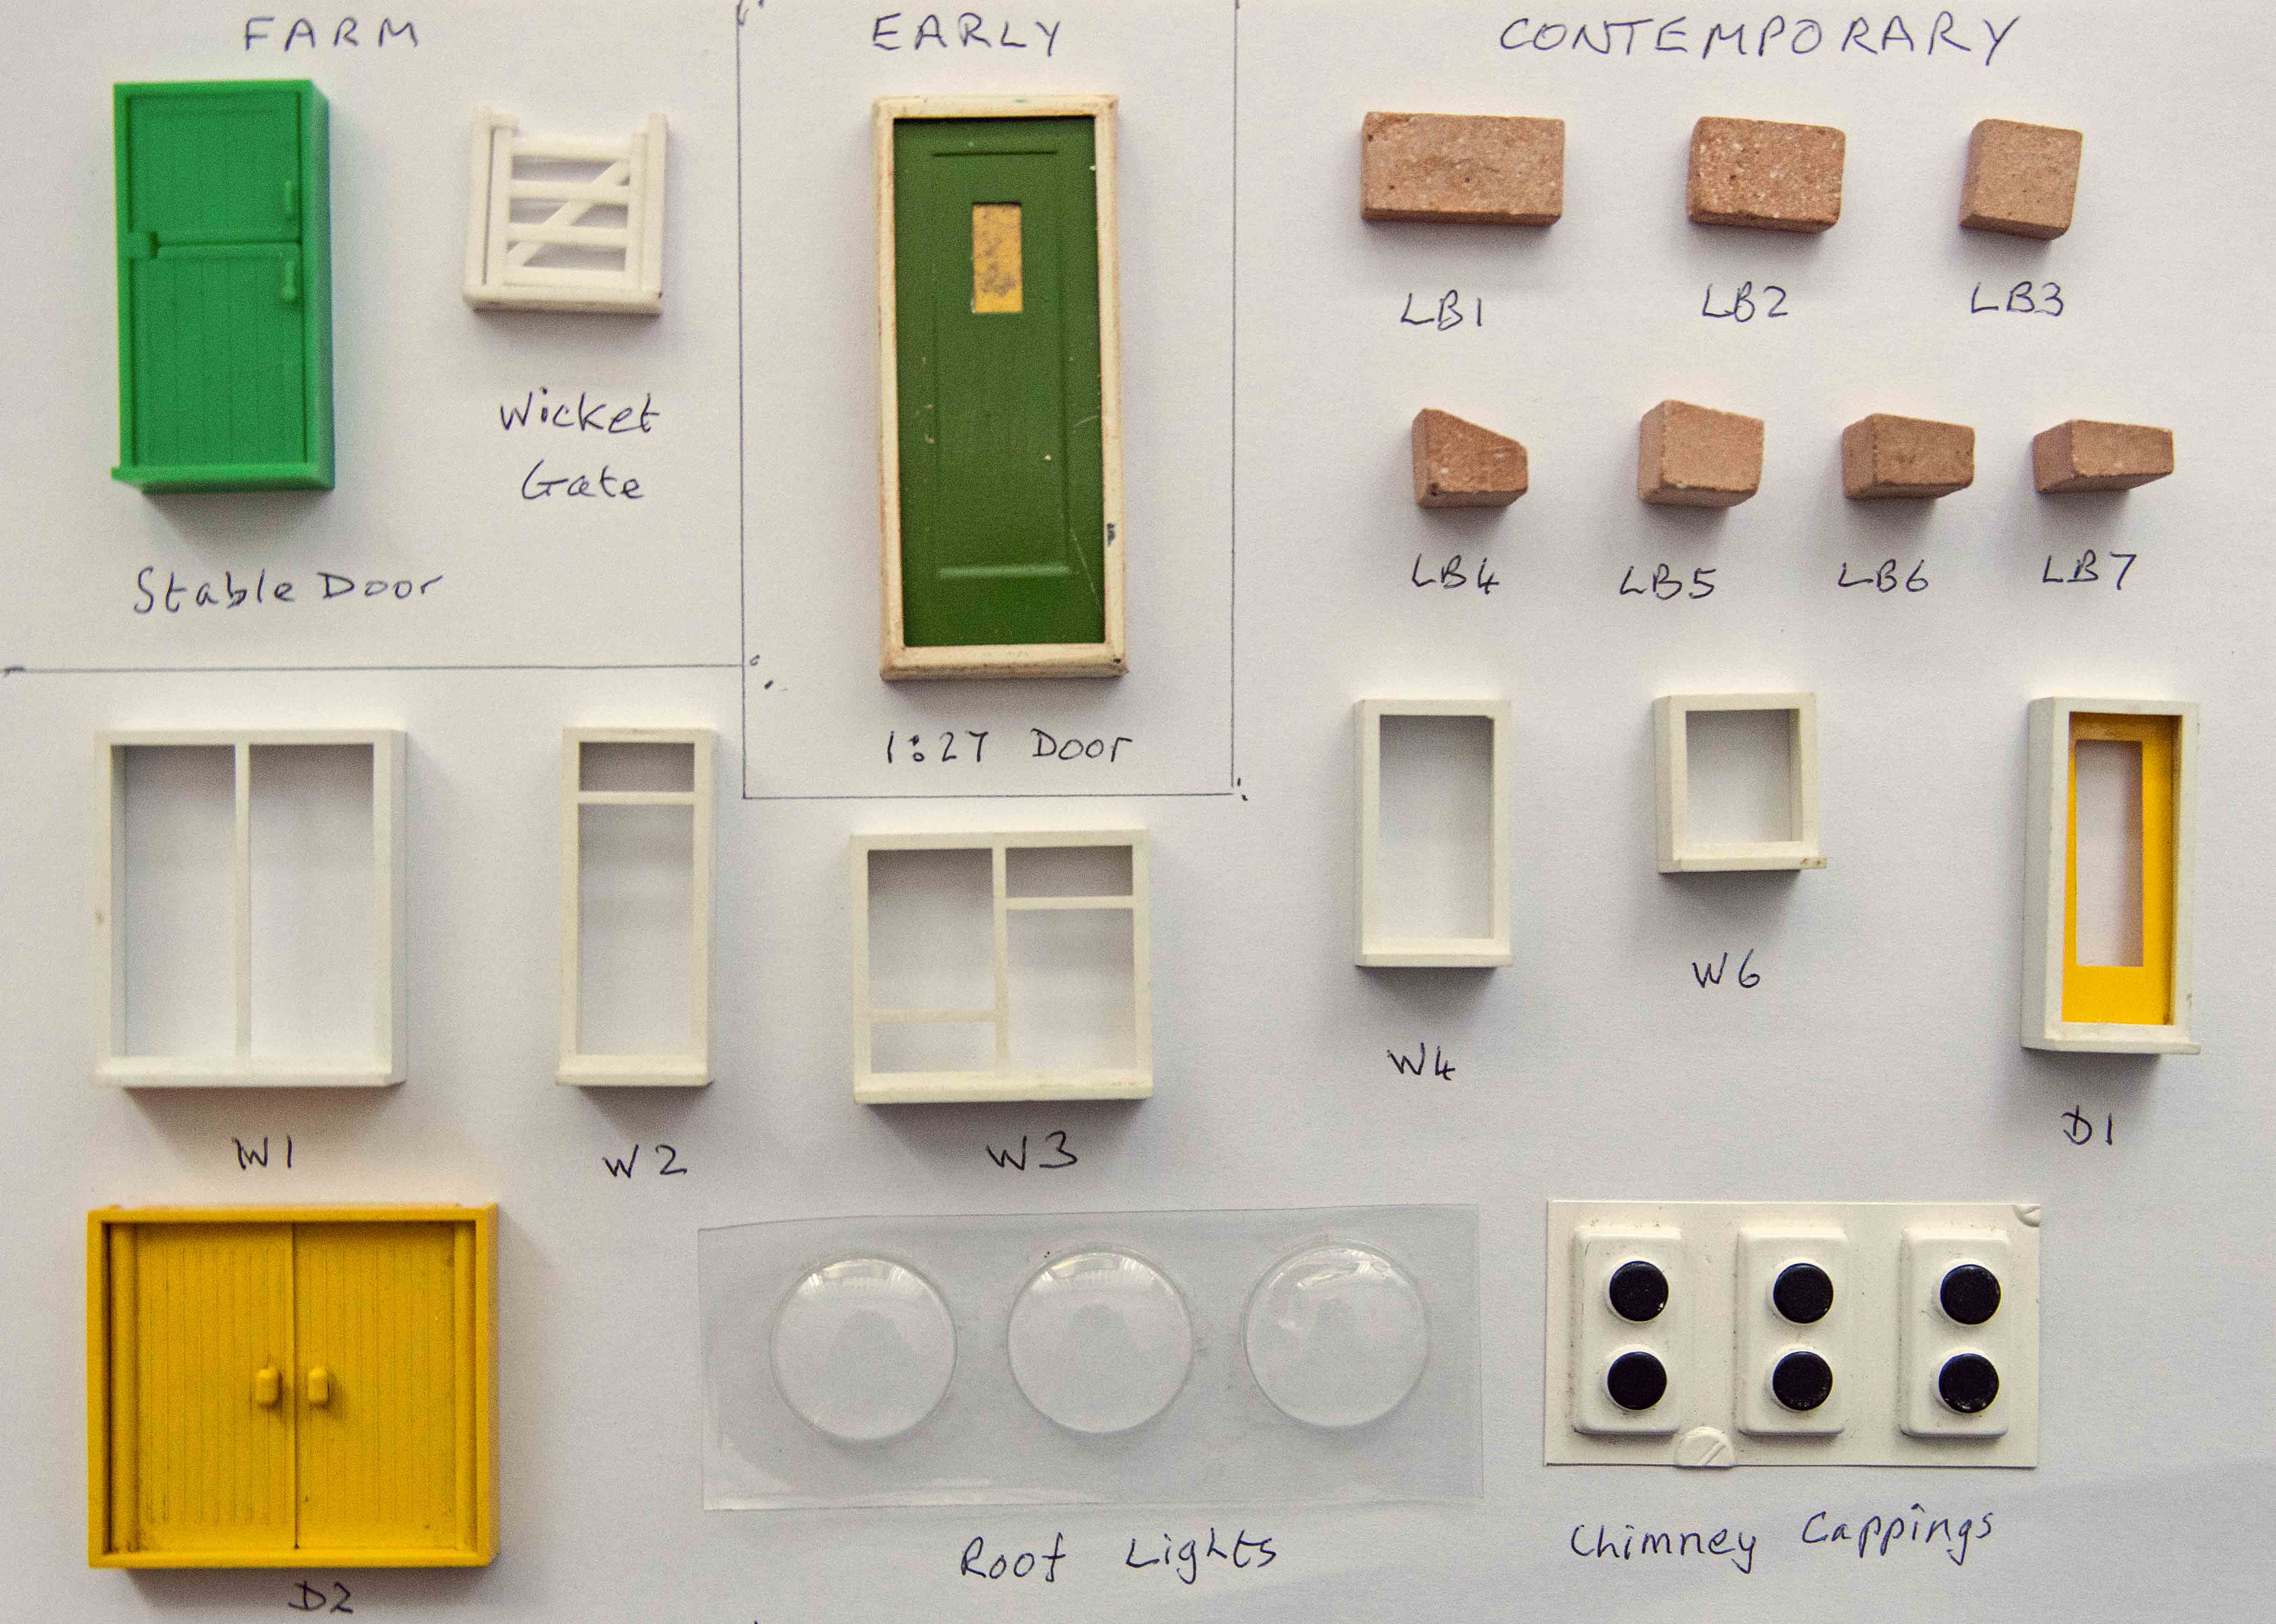
The Standard Brickplayer windows F1 to F6 are used, but a new window, F7, is a wider version of F6. The larger (garage) doors are also a little different.
The gable bricks B4, B5 and B6 are gone, replaced by bricks LB4, LB5, LB6 and LB7 to create roofs with shallower slopes. To show this clearly, these bricks have been pictured side-on in the above image. The Standard Brickplayer gable bricks sloped up one course per ¼". Using the new LB4 the gradient reduces to one course per ½". Bricks LB5, LB6 and LB7 are used as a set to create an even shallower gradient of one course per 1½". Standard Brickplayer bricks B8 and B9 were dropped; Contemporary Brickplayer buildings did not have 45° angles.
The windows are redesigned, losing the small square panes of the Standard Brickplayer windows, again to reflect more modern styles. There is no bay window (a feature that would then have been considered old-fashioned) and only the smaller garage door. It is yellow, as is the insert for the regular door.
Two new elements are the roof lights and chimney cappings, which were always supplied in strips of three to be cut apart as needed.
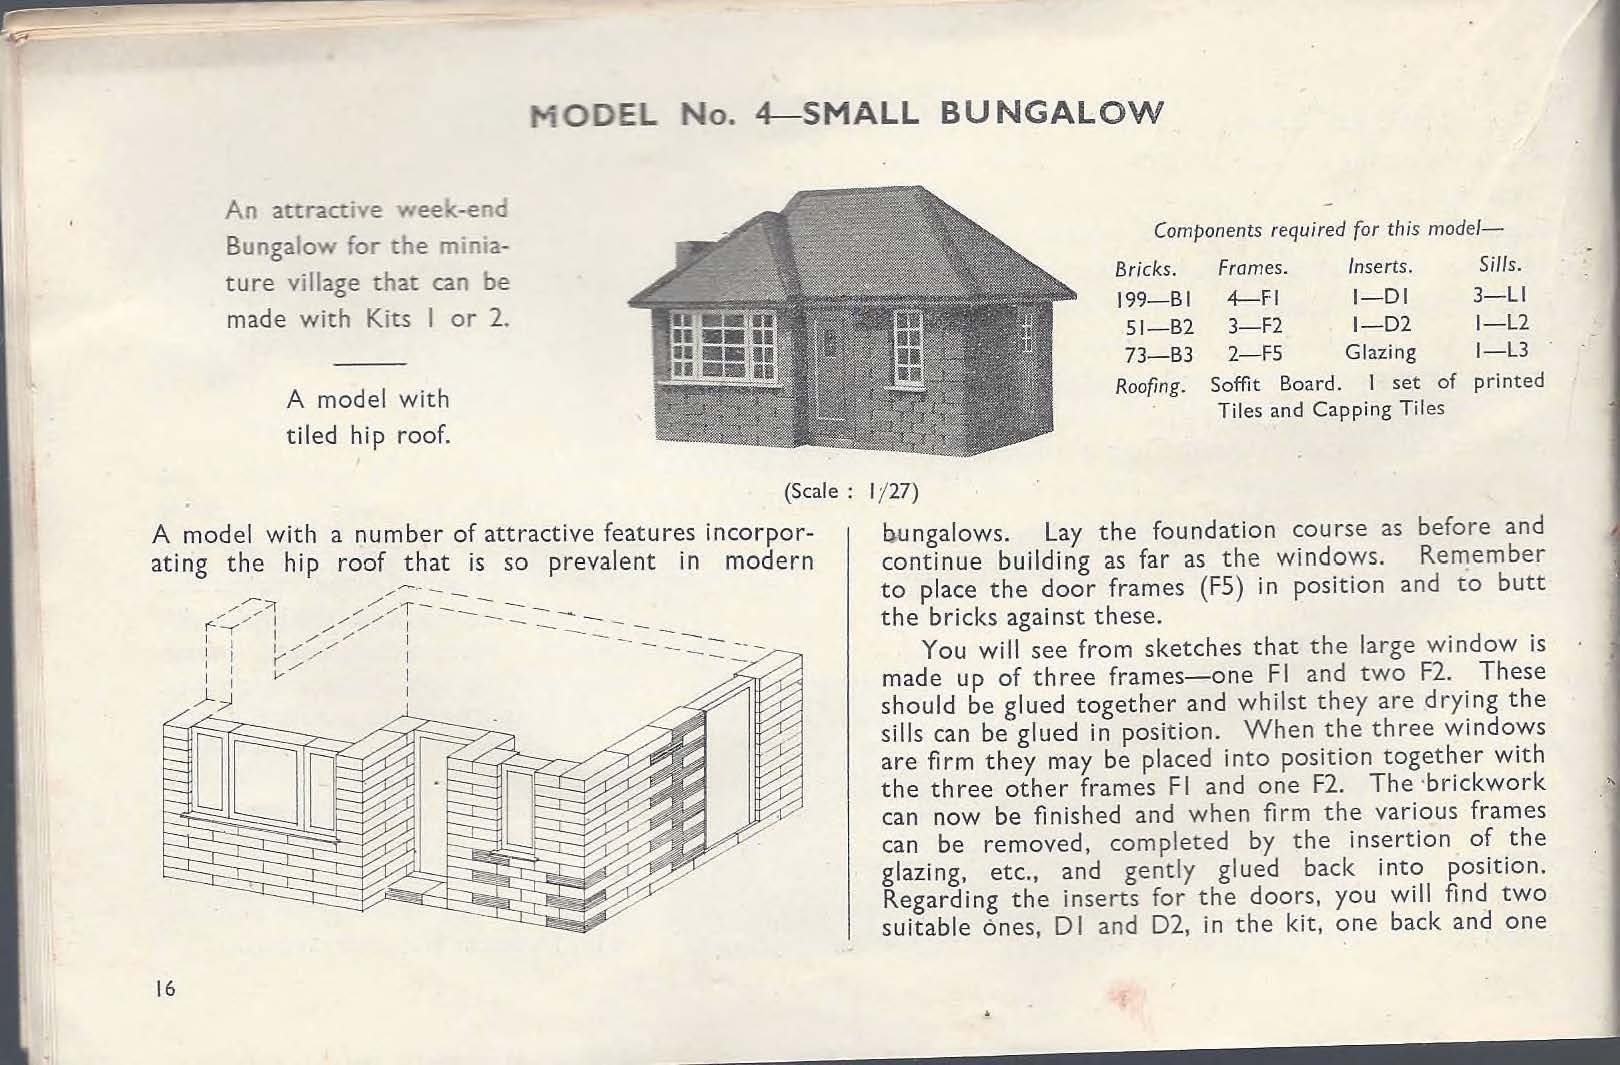
The images below are from an Early Brickplayer instruction booklet, and show the windows and doors. The door frame F5 is substantially larger than in Standard Brickplayer since it is at 1:27 scale. It scales up correctly to a regular door size in the building plans.
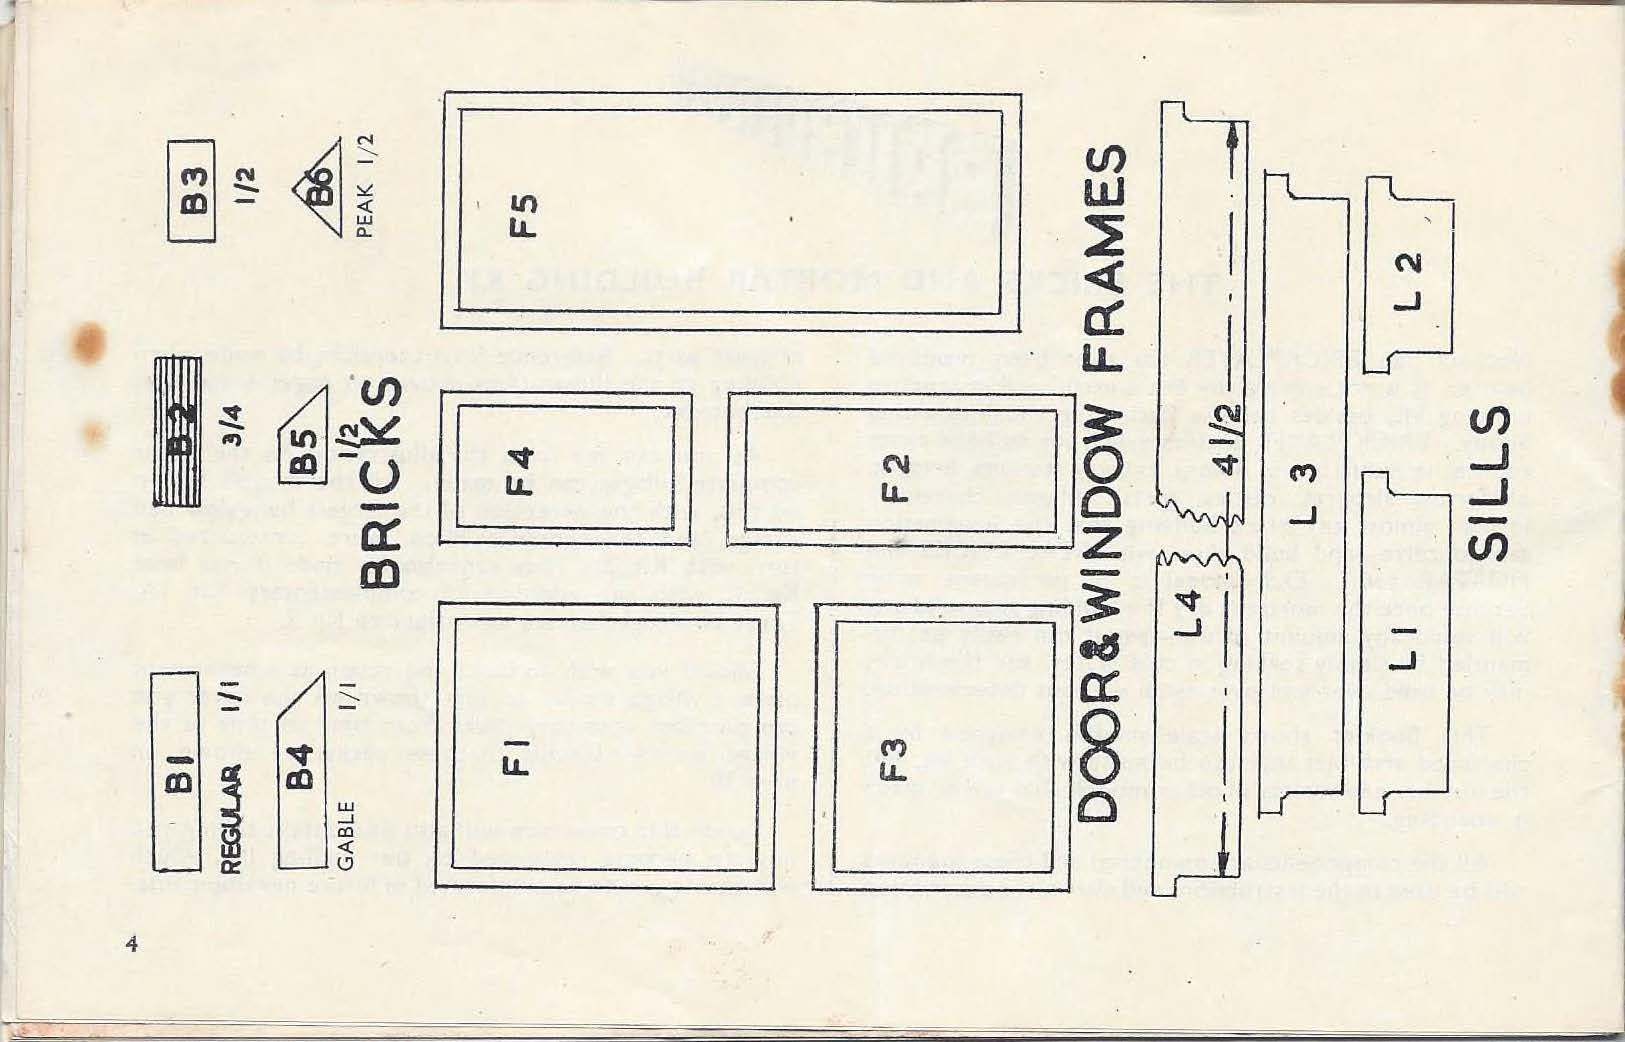
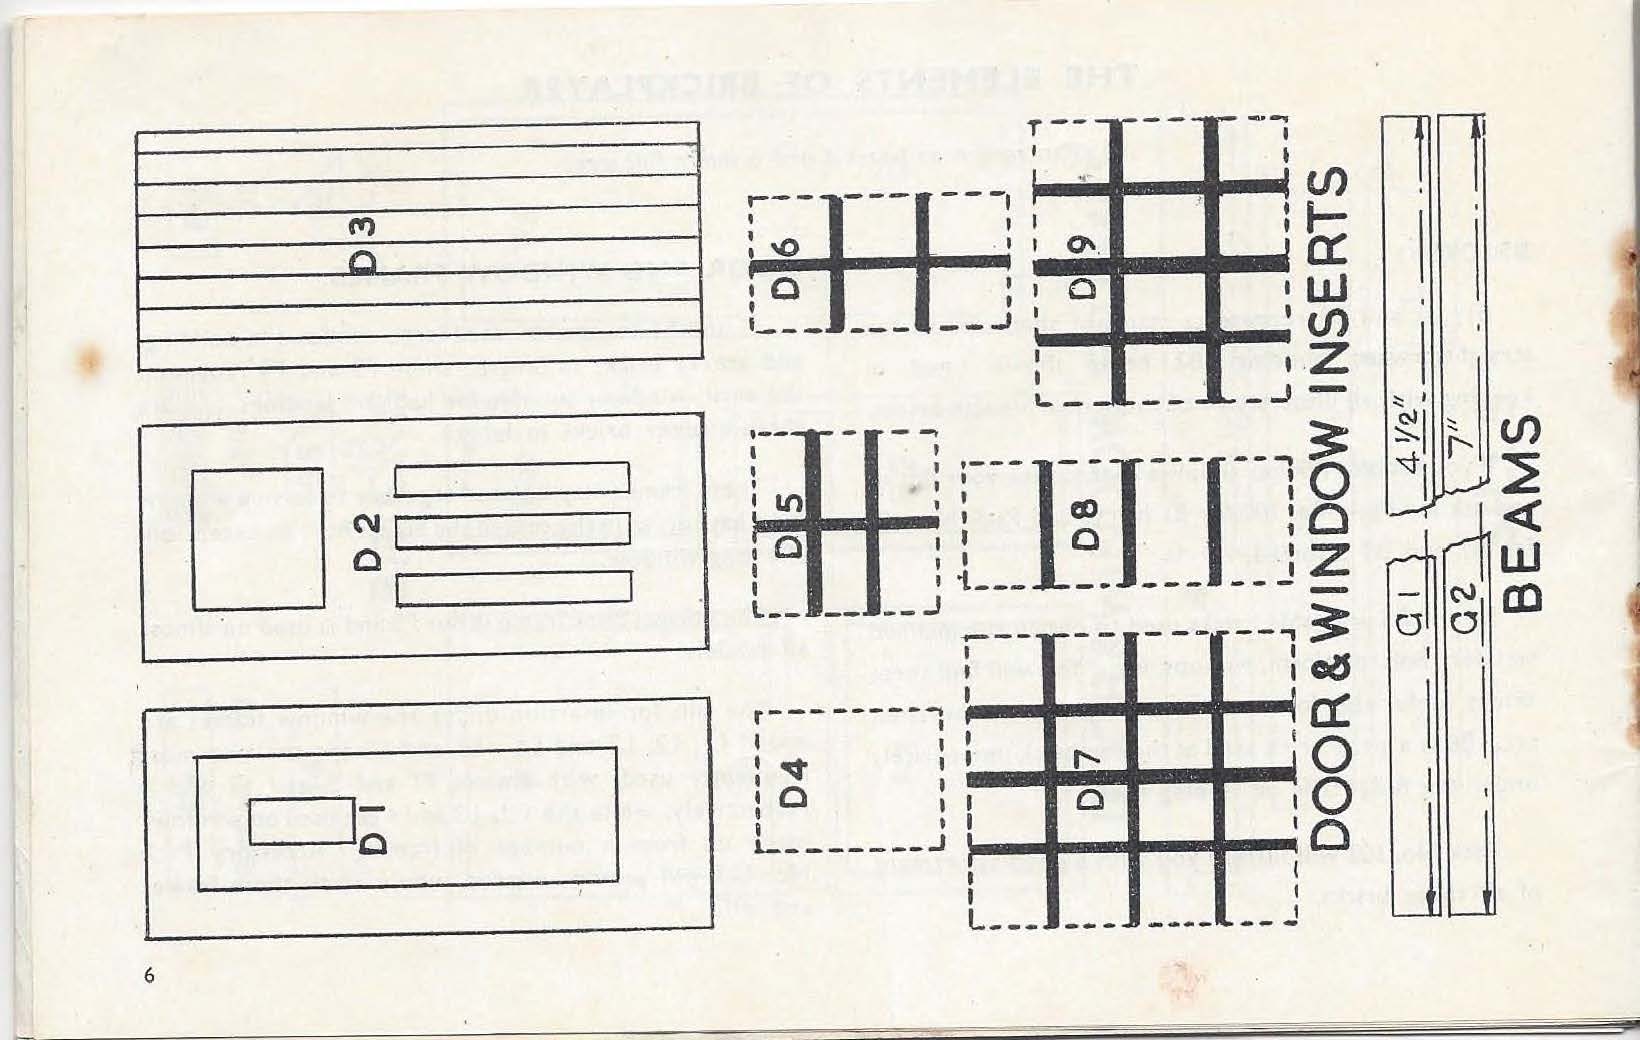
The frames were metal and three metal inserts, D1, D2 and D3, were provided for to make different styles of doors. Window frames were plain metal rectangles. The window inserts D4 to D9 were printed on paper; they had to be cut out and glued into the frames. Different sizes of window sill, L1 to L4, had to be glued to the bottoms of the frames.
However, I have another Early Brickplayer instruction booklet (version 2), that shows an upgraded, more user-friendly form of window elements. The windows now have cross-pieces (called mullions and transoms) and sills.
The window frames are now identical to the F1 to F4 in Standard Brickplayer. They are still meant to be scaled 1:27, so would in effect be smaller in the scaled-up buildings than the Standard Brickplayer windows. Standard Brickplayer used F1 to F4 to create larger windows, and introduced the smaller F6.
The two instruction booklets provide instructions for the same 8 models, modified only by calling for windows to have separate insert and sill components in the first version. The images below are interesting because they show those differences. The list of parts in version 1 calls for the window sills, while in version 2 they are not needed. The image on the left clearly has version 1 windows because the sills project to the sides - the later version 2 windows have sills attached but they are only as wide as the windows themselves. However, the inserts of the F2 windows have vertical cross-pieces (mullions), which do not match the D8 inserts shown in page 6 (above) for that window size. I believe that the page 6 version of D8 in version 1 must be wrong.
Notice, however, that the pictures of the model are identical in the two versions (and this is the case with all the models). In particular, the version 2 picture shows windows with projecting sills. It seems that Spears have not bothered to create fresh pictures when they upgraded the window elements.

Standard Brickplayer also used tiling and concrete sheets, but now pieces for even the simpler roofs were marked out on the tiling sheets. Thus, Kits 3 and 4 contained sheets of roofing tiles labelled A to E (Kit 3 only had A, B and C) printed with the outlines of the various pieces of roofing for the different models. However, it seems that at some time Spears either did not or could not provide tiling sheets marked out in that way. I have the envelope shown below.
It contains the instructions booklet, the blueprints, the "Elements of Brickplayer" sheet at the top of this page and the larger folded sheet below.
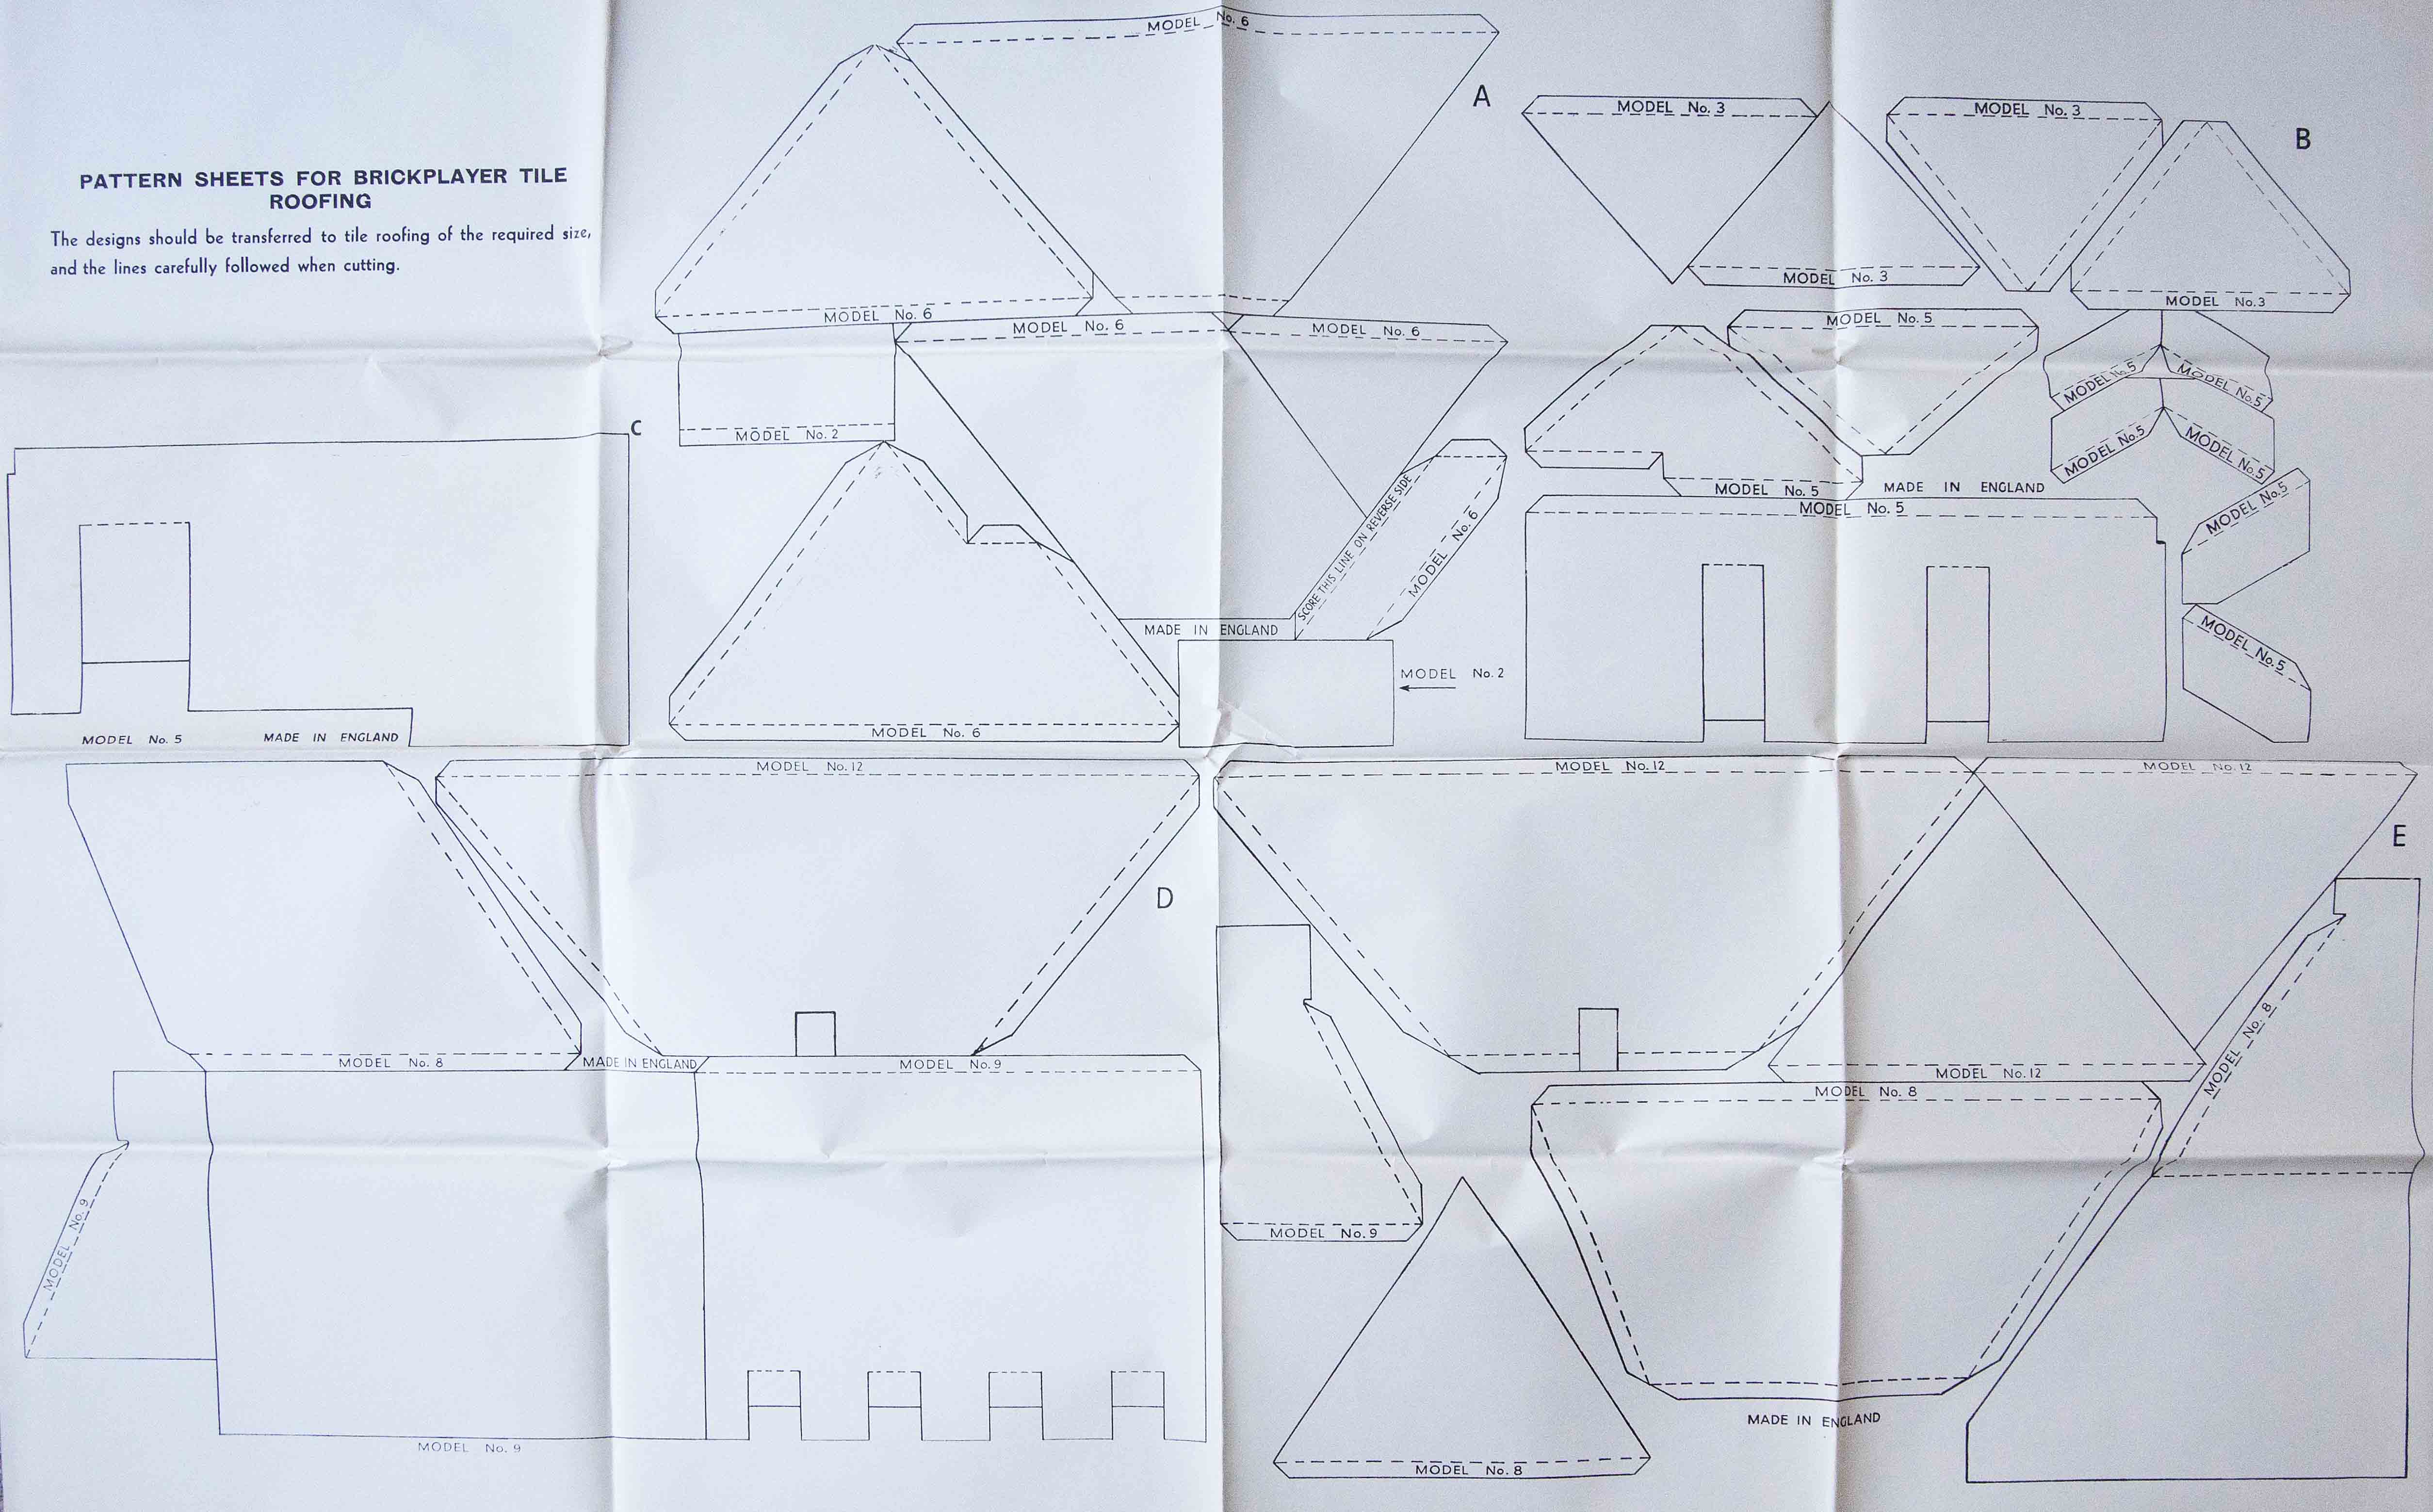
This was clearly intended for the user to mark up unprinted tiling sheets. When this package was provided, it seems that the box lid did not show the elements and the tiling sheets were not marked up.
A puzzle: which came first? One argument is that this package was used when Kits 3 and 4 were launched, and that the more user-friendly printing inside the box lid and on the roofing sheets came later. Early Brickplayer kits did not have printing inside the lid, but they did have some tiling sheets marked up for the user, which instead suggests that the package was an emergency solution when the company was unable to provide the printed parts.
Contemporary Brickplayer additionally had sheets of aluminium and pantile roofing.
A few other specialised components were introduced in Contemporary, Farm and American kits to add realism to specific models.
More links: This Brickplayer website sits within my personal website tonyohagan.co.uk. The links below provide access to the other parts of my website.

|

|

|

|

|

|